
A garden fence is not just about making the yard look finished. Planning your vegetable garden layout and spacing before the fence goes up saves a lot of rework later.
The real job is to protect plants from pests, foot traffic, wind, and unclear garden edges.
A DIY garden fence can solve those problems, but only when the post type, wire, height, and gate placement match the space.
In practice, many fence problems start with small choices, like shallow post holes, loose wire, or a gate added too late.
Here are the materials, setup tips, building steps, and fence ideas that can help you plan it the right way.
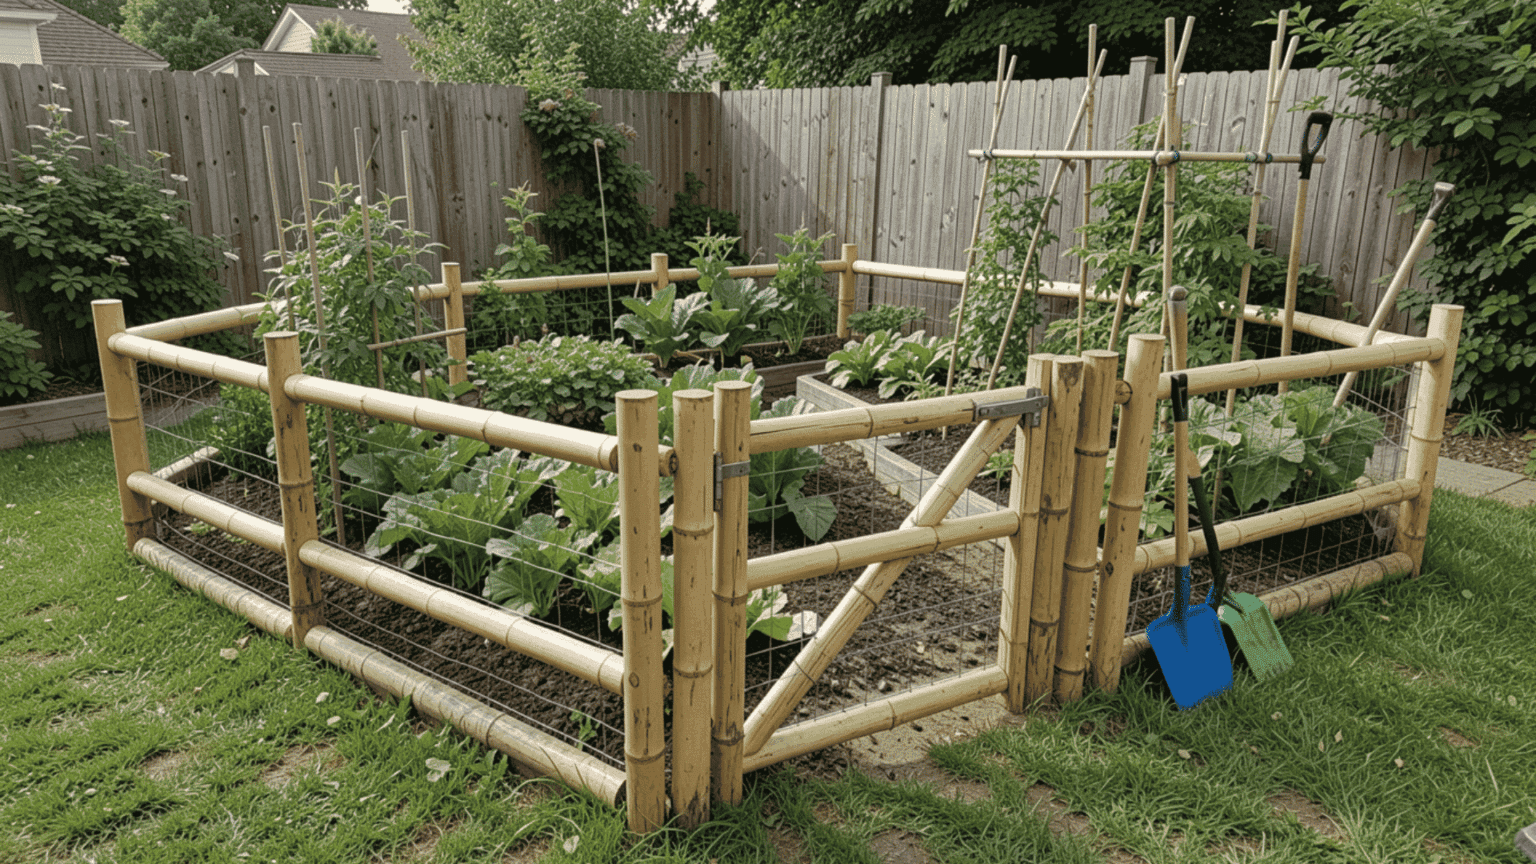
What Is a DIY Garden Fence?
A DIY garden fence is a homemade barrier built around a garden. It helps keep pests out, marks the space, and protects plants.
Most fences use wood posts, metal T-posts, rails, welded wire, hardware cloth, or pickets. The right material depends on your garden size, budget, and the type of pests you want to block.
Many people build their own fence because it costs less than hiring a contractor. It can also be done with basic tools and a free weekend.
A DIY fence can be simple, sturdy, or decorative based on your garden style. You can build a small border fence or a full perimeter fence using the same basic skills.
Supplies You Need for a DIY Garden Fence
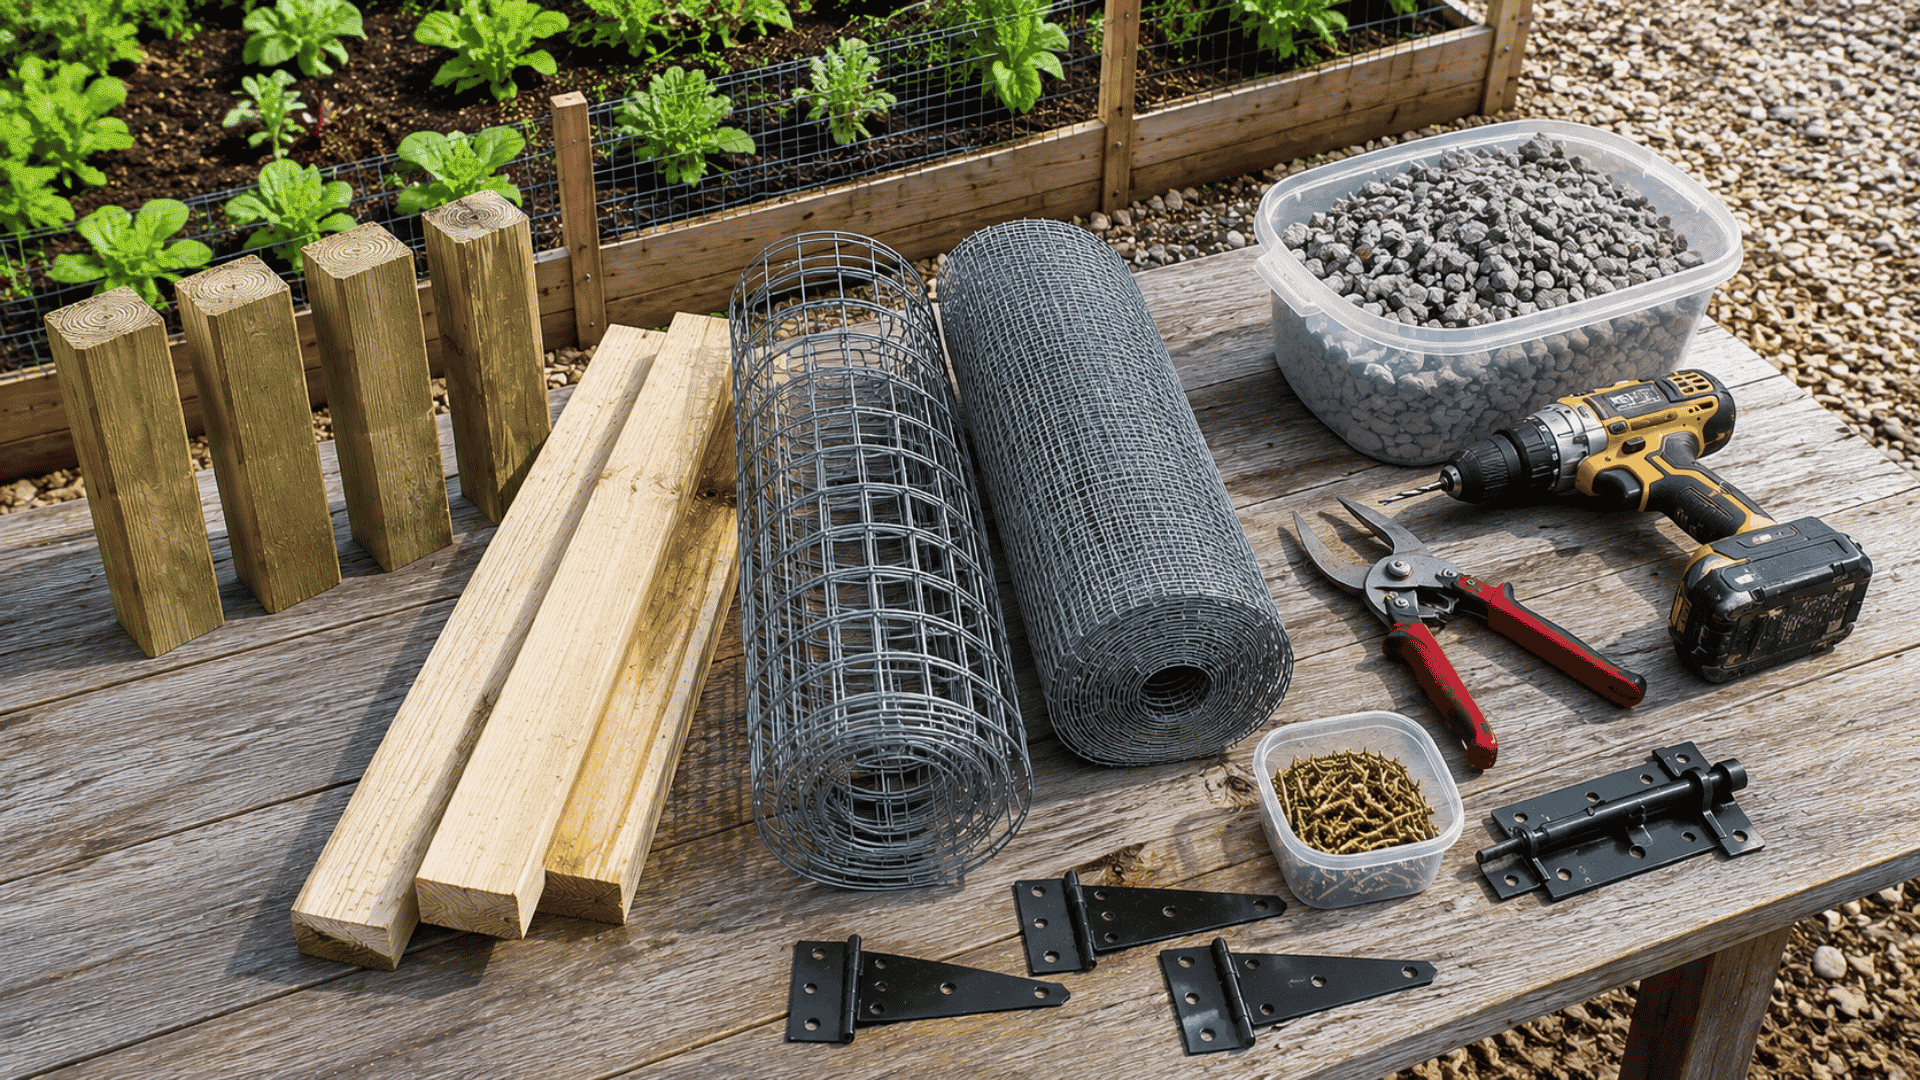
You only need basic tools and common materials to build a DIY garden fence. Most supplies are easy to find at a home improvement store.
| Supply | Why You Need It |
|---|---|
| 4×4 pressure-treated posts | Set the main frame in the ground |
| 2×4 pressure-treated lumber | Creates horizontal rails between posts |
| Welded wire fencing or hardware cloth | Forms the barrier that helps keep pests out |
| Post-hole digger or auger | Digs holes for stable posts |
| Gravel | Helps with drainage at the base of each post |
| Exterior screws | Fasten rails to posts |
| Wire snips | Cuts fencing material to size |
| Drill | Drives screws into the lumber |
| T-hinges and a gravity latch | Needed if you are adding a gate |
Use 14-gauge welded wire for most garden fences. Use hardware cloth for rabbits, rodents, or small pests; natural removal of voles helps control underground diggers that fences alone may not fully stop.
Best Fence Post Option for DIY Garden Fences
The best fence post depends on whether the fence is permanent or temporary. Wood posts are stronger, while metal T-posts are faster to install and remove.
Use 4×4 pressure-treated wood posts set in concrete for long-term fences, gates, taller builds, and deer protection. Use metal T-posts for seasonal garden barriers or fences you may remove later.
- Use wood posts for permanent vegetable gardens.
- Use wood posts for taller deer fences.
- Use metal T-posts for seasonal barriers.
- Use T-posts or garden stakes for small raised bed borders.
Safety Tips Before You Start
Take a few simple safety steps before you start digging, mixing concrete, or using power tools.
- Wear gloves when handling concrete mix.
- Use a dust mask when pouring dry cement.
- Work outside or in a well-ventilated area.
- Call 811 in the US before digging.
- Keep children away while mixing and pouring concrete.
- Wash your hands, tools, and clothes after using wet concrete.
These small steps help keep the fence project safer, cleaner, and easier to manage.
How to Build a DIY Garden Fence (Step by Step)
Have your materials ready before you start digging. Plan the project across two days so the posts have time to cure.
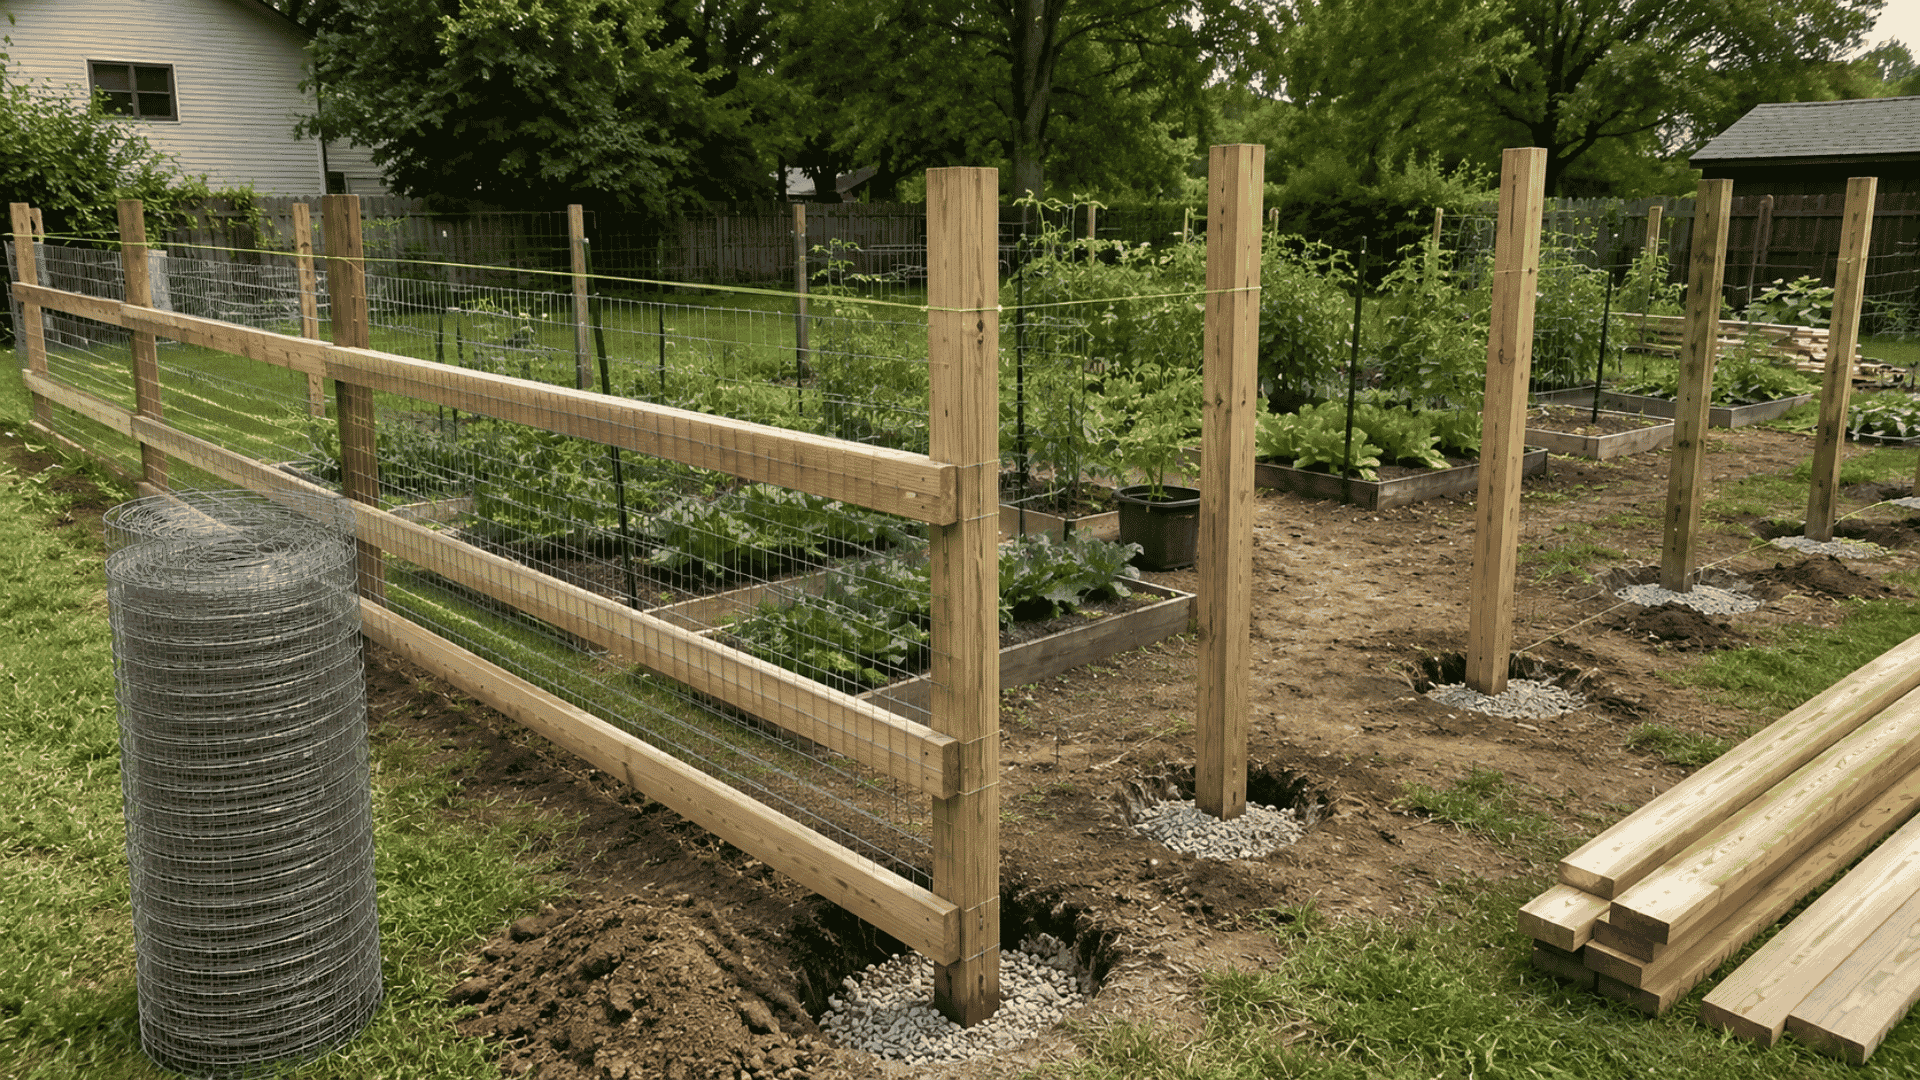
Step 1: Mark the Perimeter
Use stakes and a string line to mark the full fence shape before digging. Keep posts about 6 to 8 feet apart so the rails stay supported.
Leave a 3 to 4-foot space where the gate will go. Check the corners and overall layout now, because changes are harder once the post holes are dug.
Step 2: Dig the Post Holes
Dig each hole deep enough to hold the posts firmly in the ground. Bury at least one-third of each post so the fence can handle wire tension and weather.
Add a few inches of gravel at the bottom before setting the post. This helps water drain away from the wood and reduces the chance of early rot.
Tip: If your area has freezing winters, check the local frost line before digging. Shallow posts can shift when the ground freezes and thaws.
Step 3: Set the Posts
Set the corner posts first and check each one with a level. Brace the posts so they stay straight while the concrete sets.
Pour concrete around each post and slope the top slightly away from the wood. Let the standard concrete cure for at least 48 hours before adding rails.
Tip: Do not rush the cure time. Adding rails too early can shift the posts and make the fence lean later.
Step 4: Install the Rails
Attach 2×4 rails between the posts after the concrete has cured. Place one rail near the top and one near the bottom.
Use exterior screws or metal brackets to secure the rails. Strong rails help keep the fence from sagging.
Step 5: Attach the Fencing
Start at one corner and fasten the wire to the outside of the posts. Pull the fencing tight before stapling it along the frame.
Use welded wire for most garden fences. Use hardware cloth and bury the bottom edge if small pests dig under fences.
Tip: Attaching wire to the outside of the posts helps spread tension better and keeps the fence tighter over time.
Step 6: Build and Hang the Gate
Build the gate frame from 2×4 lumber to fit the opening. Add a diagonal brace from the bottom hinge corner to the top latch corner.
Attach the wire to the gate frame, then hang it with T-hinges. Finish with a gravity latch and check that the gate swings freely.
DIY Garden Fence Ideas
A DIY garden fence can be practical, decorative, or both, depending on the materials you choose. These ideas cover simple, sturdy, and budget-friendly options for different garden needs.
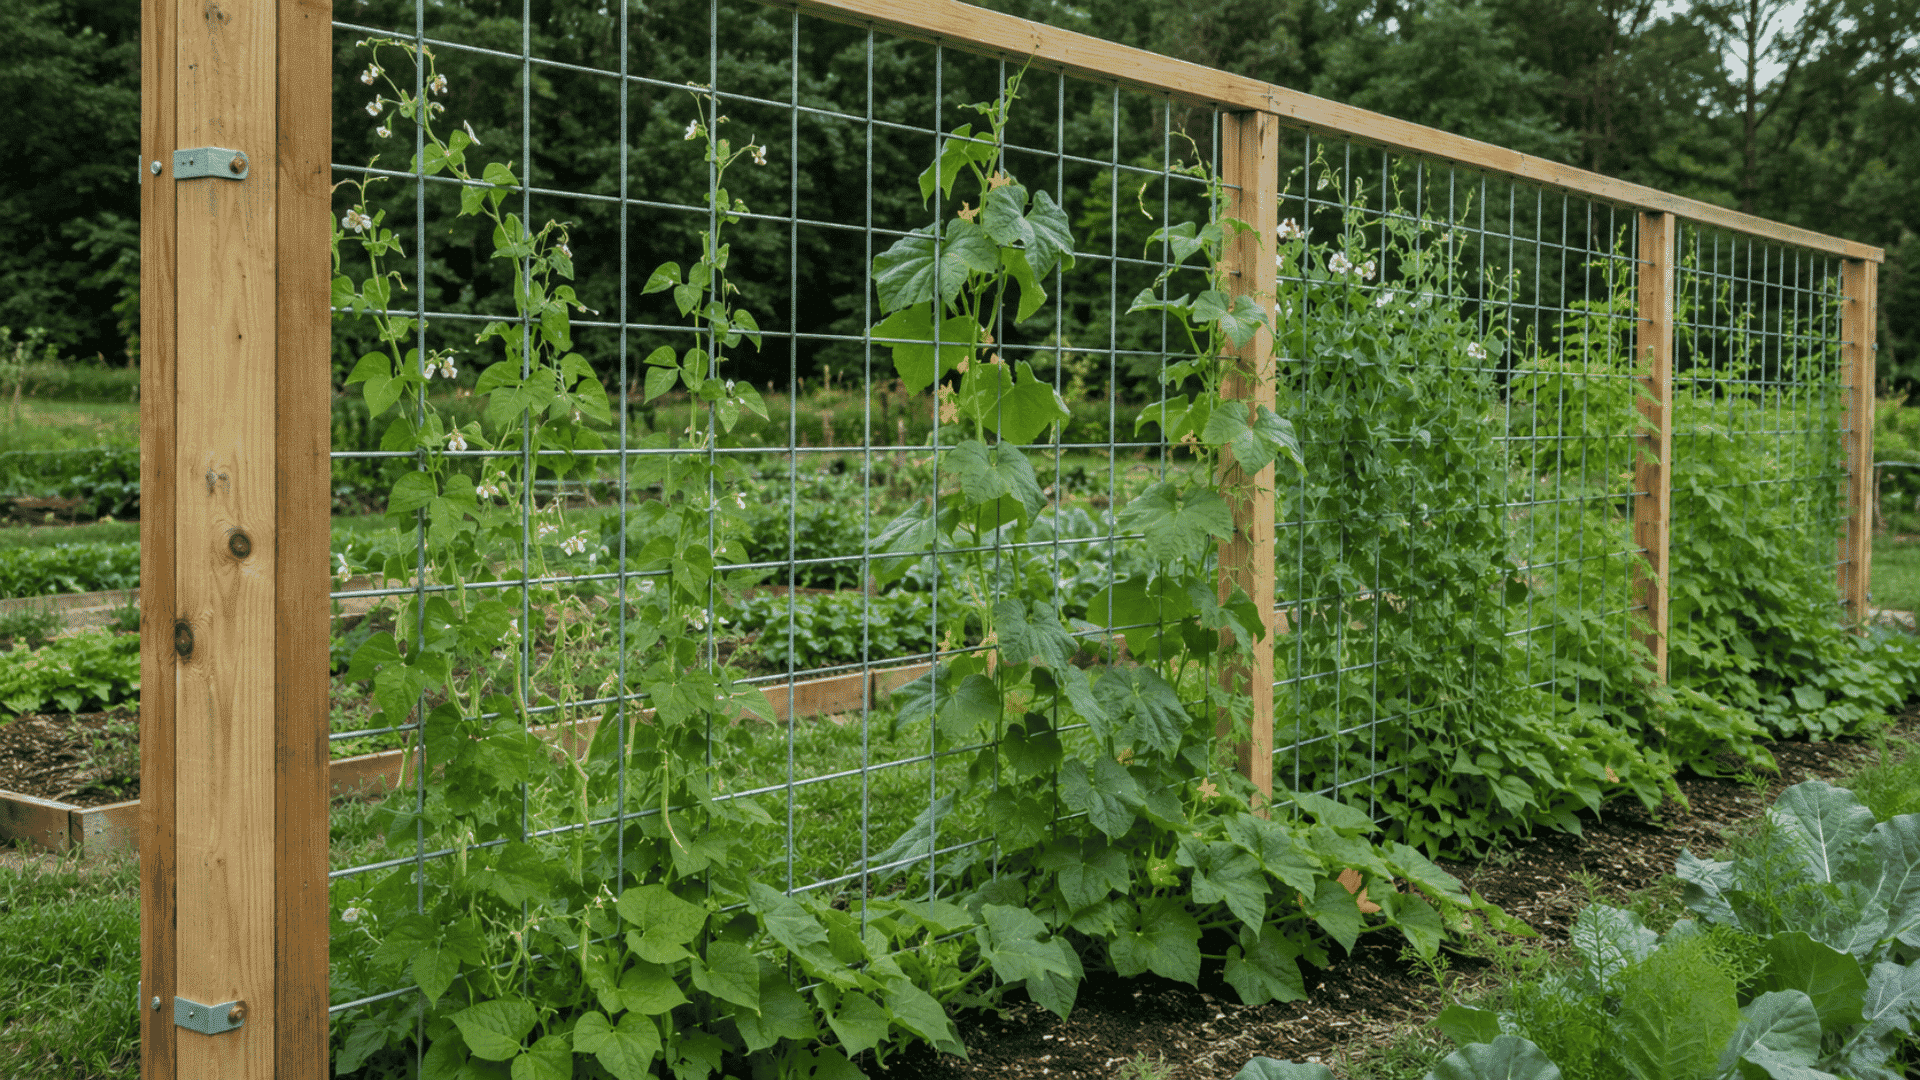
1. Farmhouse Wood and Wire Fence
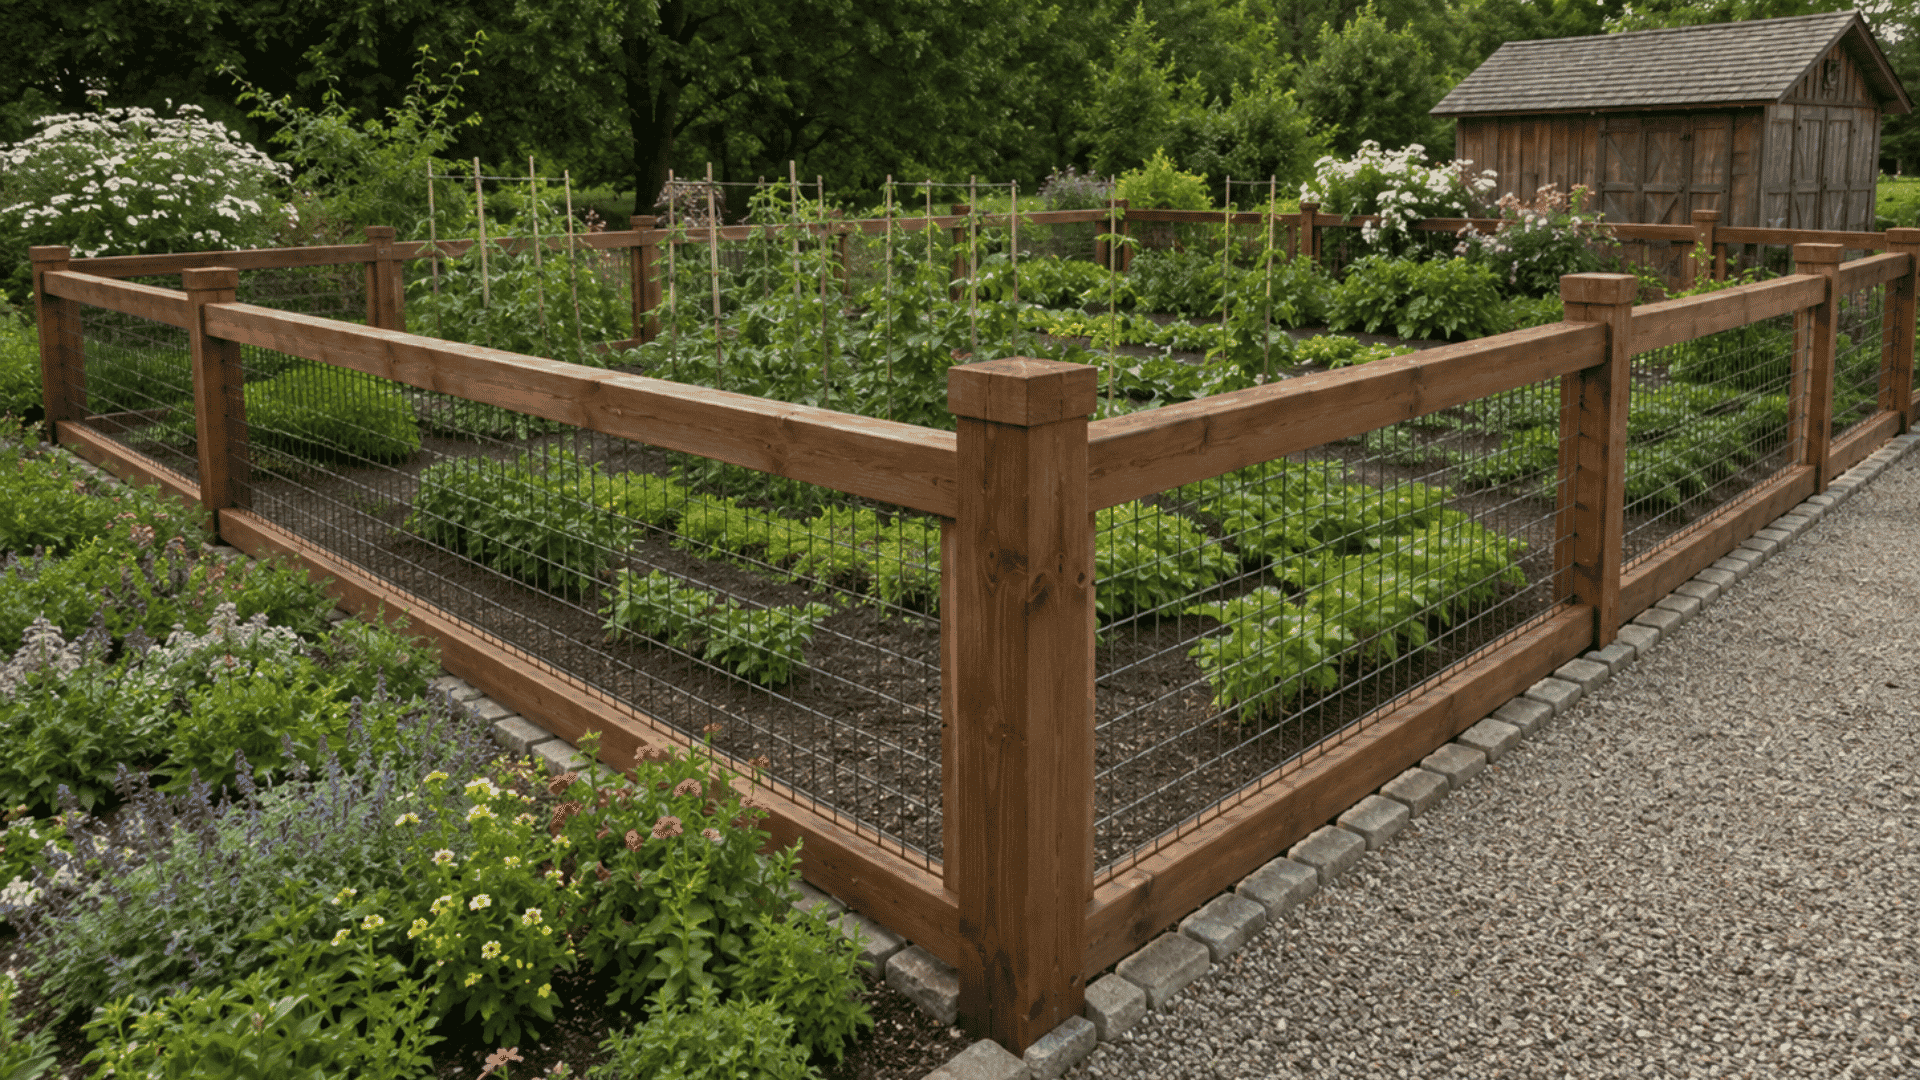
This fence is ideal for vegetable gardens, cottage flower beds, and permanent builds. It uses 4×4 wood posts, 2×4 rails, and welded wire for a clean, sturdy garden border.
Cedar, stained lumber, or pressure-treated wood can change the final look. It is a strong first choice for beginners because the build is simple and easy to adjust.
2. Cattle Panel Garden Fence
This fence is ideal for mixed-use gardens that need climbing support and pest control. Cattle panels stay straight between posts and do not sag like lighter wire.
They can support beans, cucumbers, peas, and squash without a separate trellis. Use this option when you want one fence to work as both a barrier and plant support.
3. Pallet Wood Garden Fence
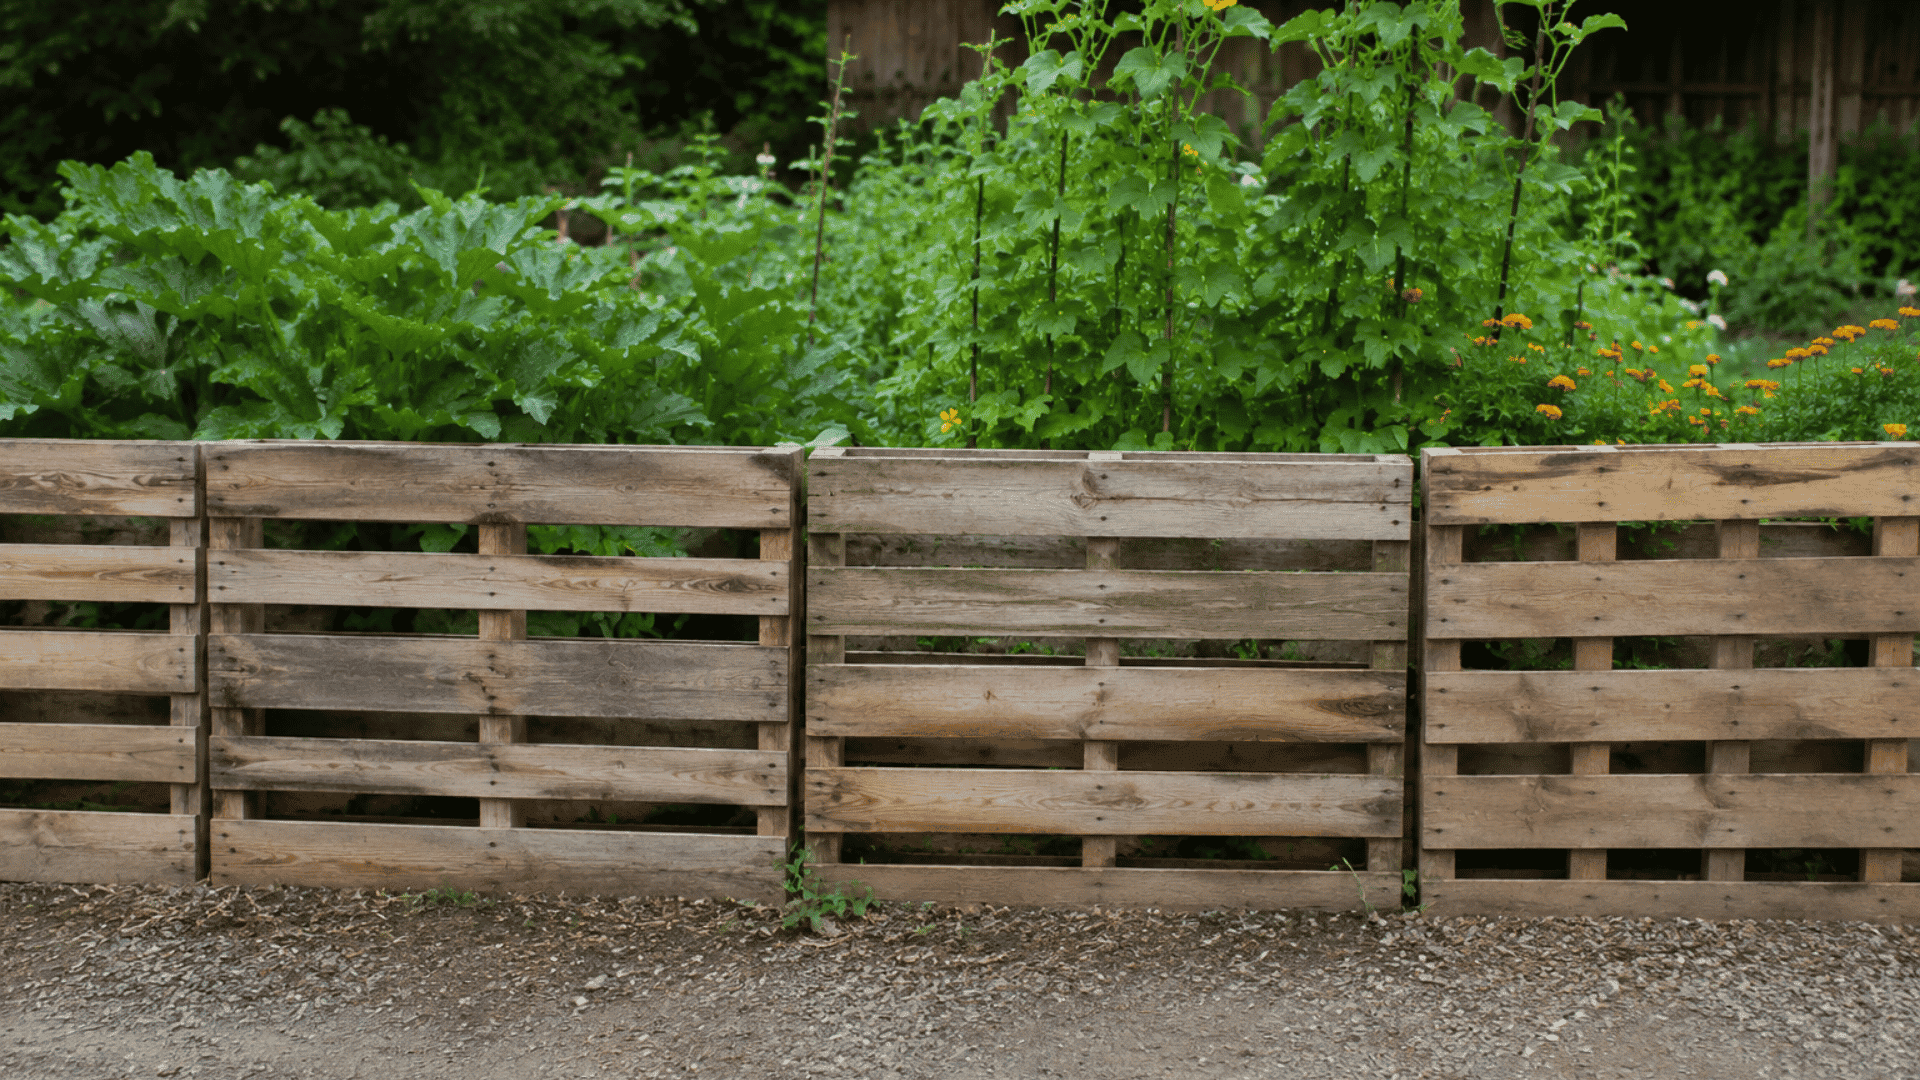
This fence is ideal for rustic gardens and low-budget backyard borders. Pallet wood can be reused to make a simple fence with a weathered, homemade look.
It works best for low borders, garden edges, or areas where style matters more than heavy pest control. Paint or stain can help it look more finished and last longer outdoors.
4. Simple T-Post and Wire Fence
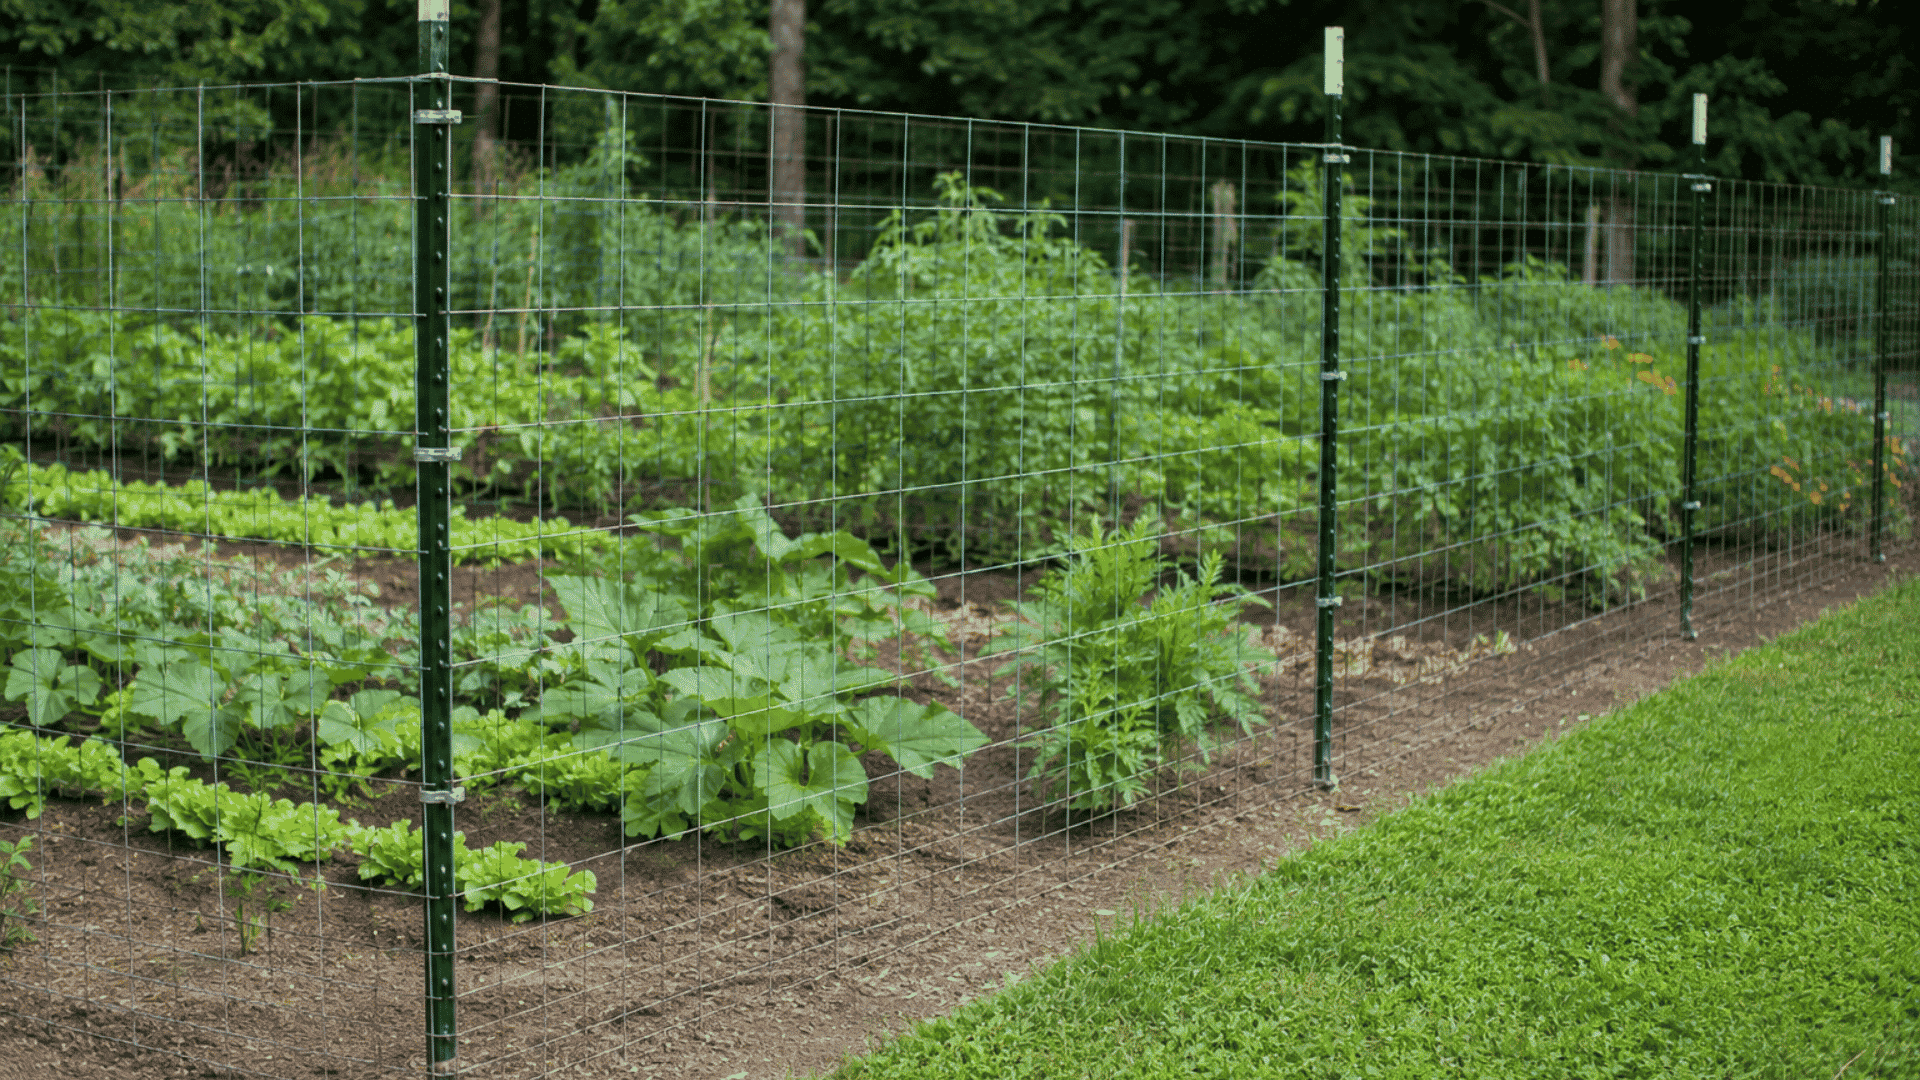
This fence is ideal for seasonal vegetable gardens that come down in winter. It uses metal T-posts and welded wire, so there is no concrete, lumber cutting, or long wait time.
It is not the most decorative choice, but it is practical and easy to remove. Use it when function, low cost, and speed matter more than appearance.
5. Split Rail Fence with Wire Backing
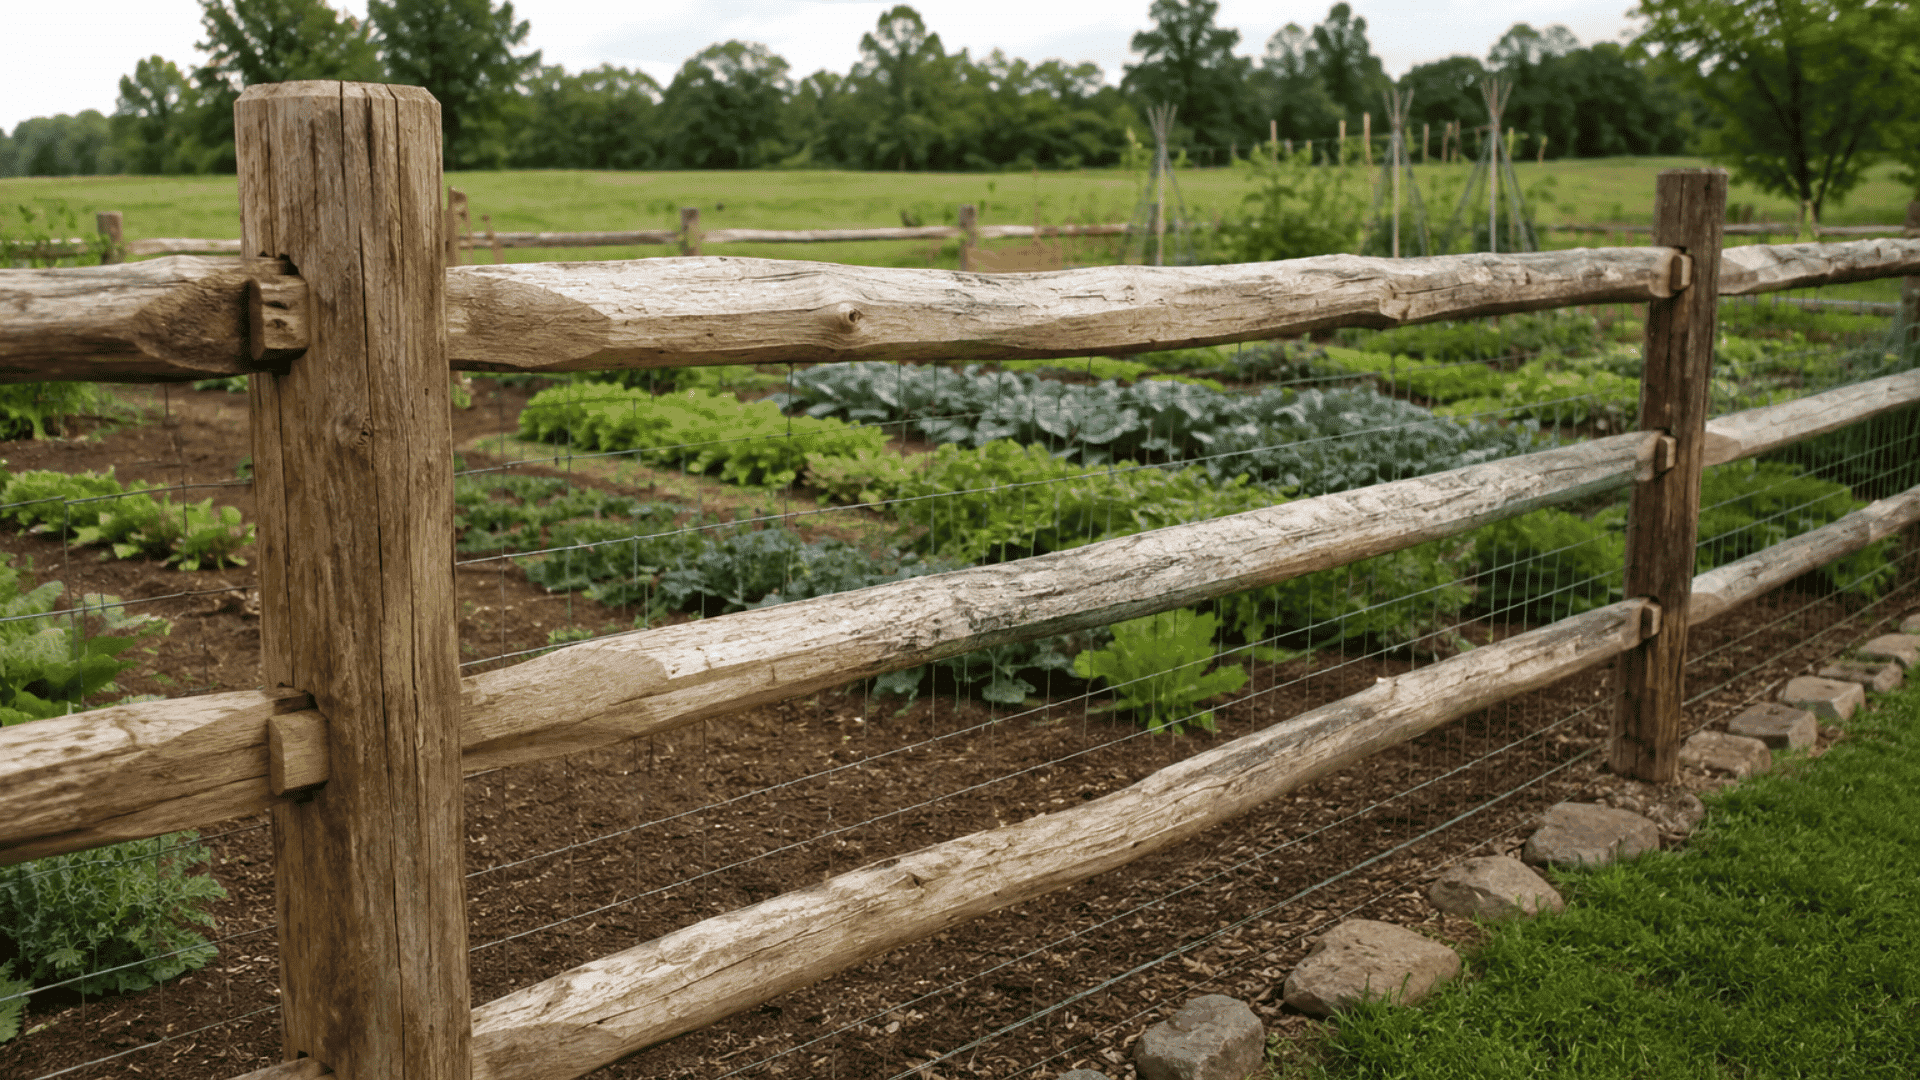
This fence is ideal for larger gardens, farmhouse yards, and country-style spaces. A split rail fence gives a wide garden an open border without fully closing it in.
Since the gaps between rails are large, wire backing is needed if pests are a concern. Welded wire keeps the fence useful without hiding the rail style.
6. Bamboo Roll Fence
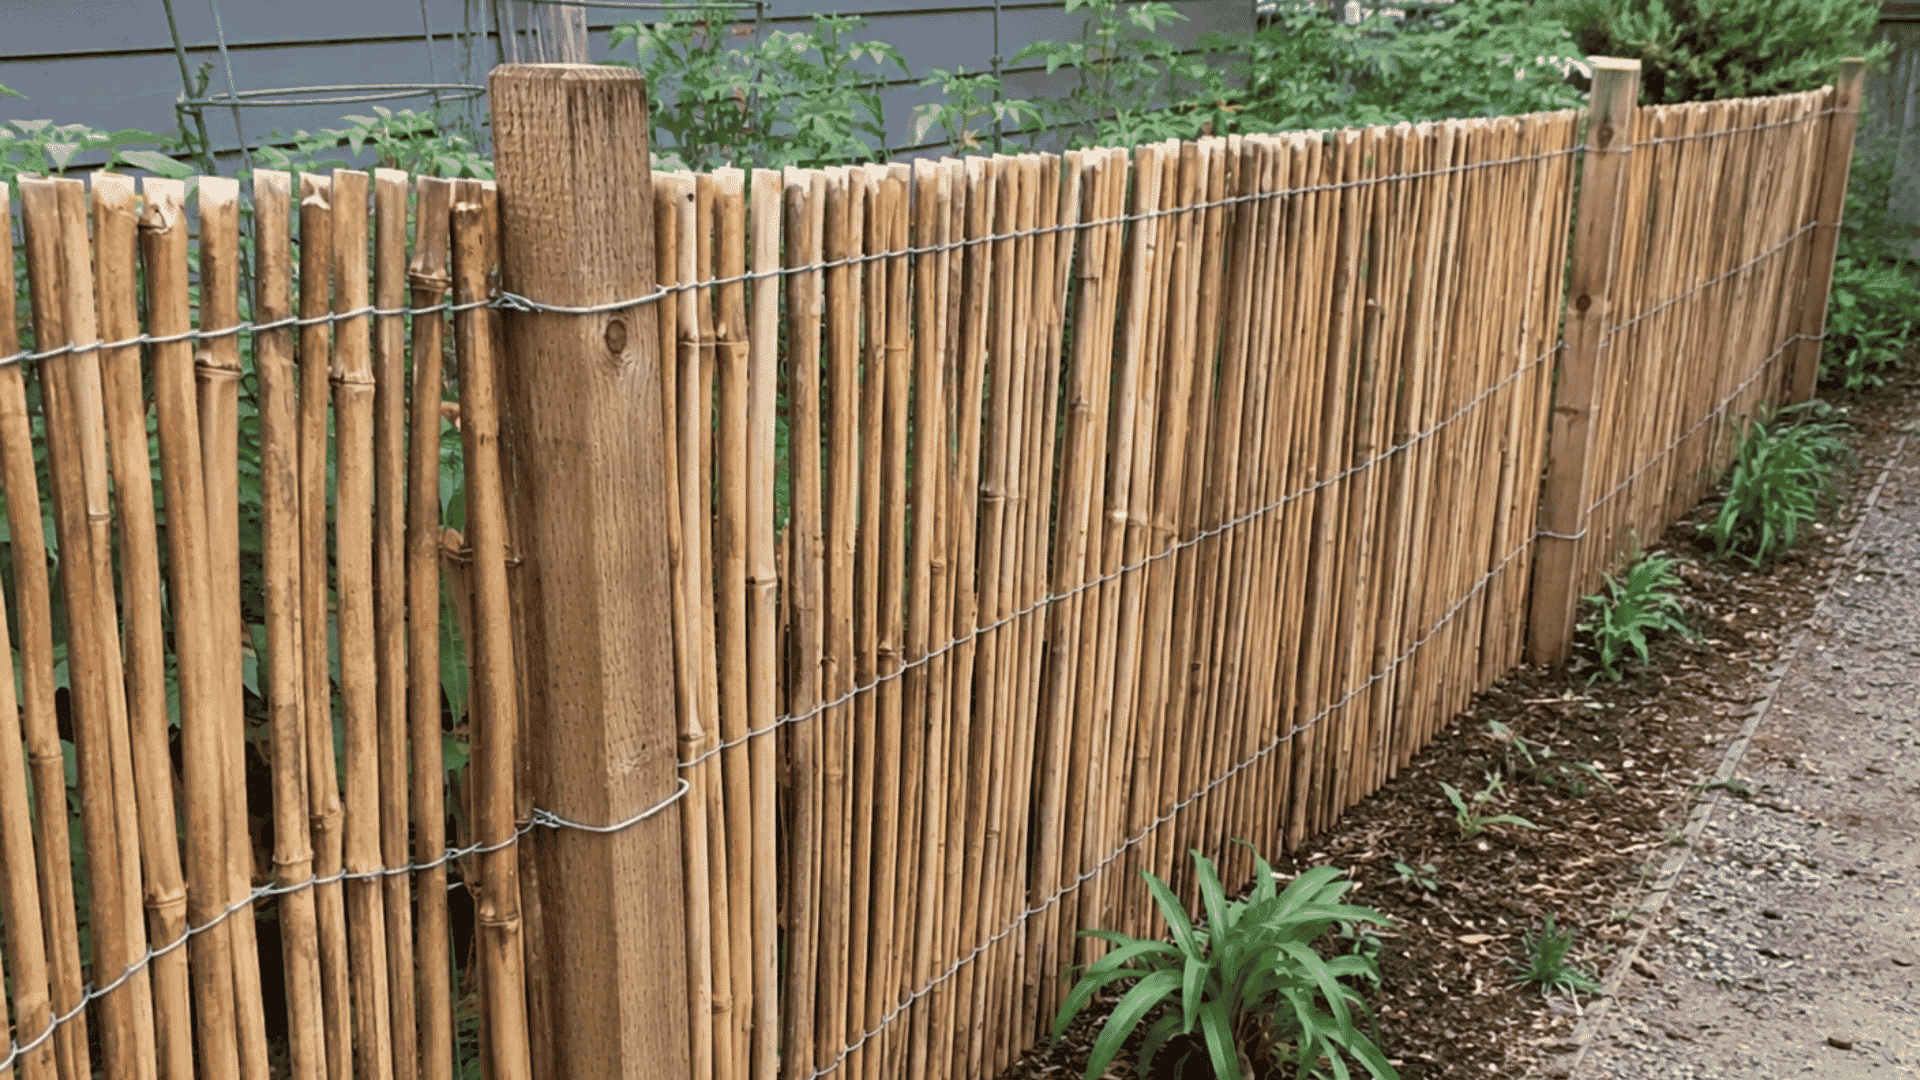
This fence is ideal for natural garden styles, privacy corners, and decorative borders. Bamboo roll fencing attaches to posts, stakes, or an existing frame with simple ties.
It works well around seating areas, flower beds, or calm garden corners. It is better for light screening than heavy pest control, so avoid it in very windy spots.
7. Hardware Cloth Raised Bed Fence
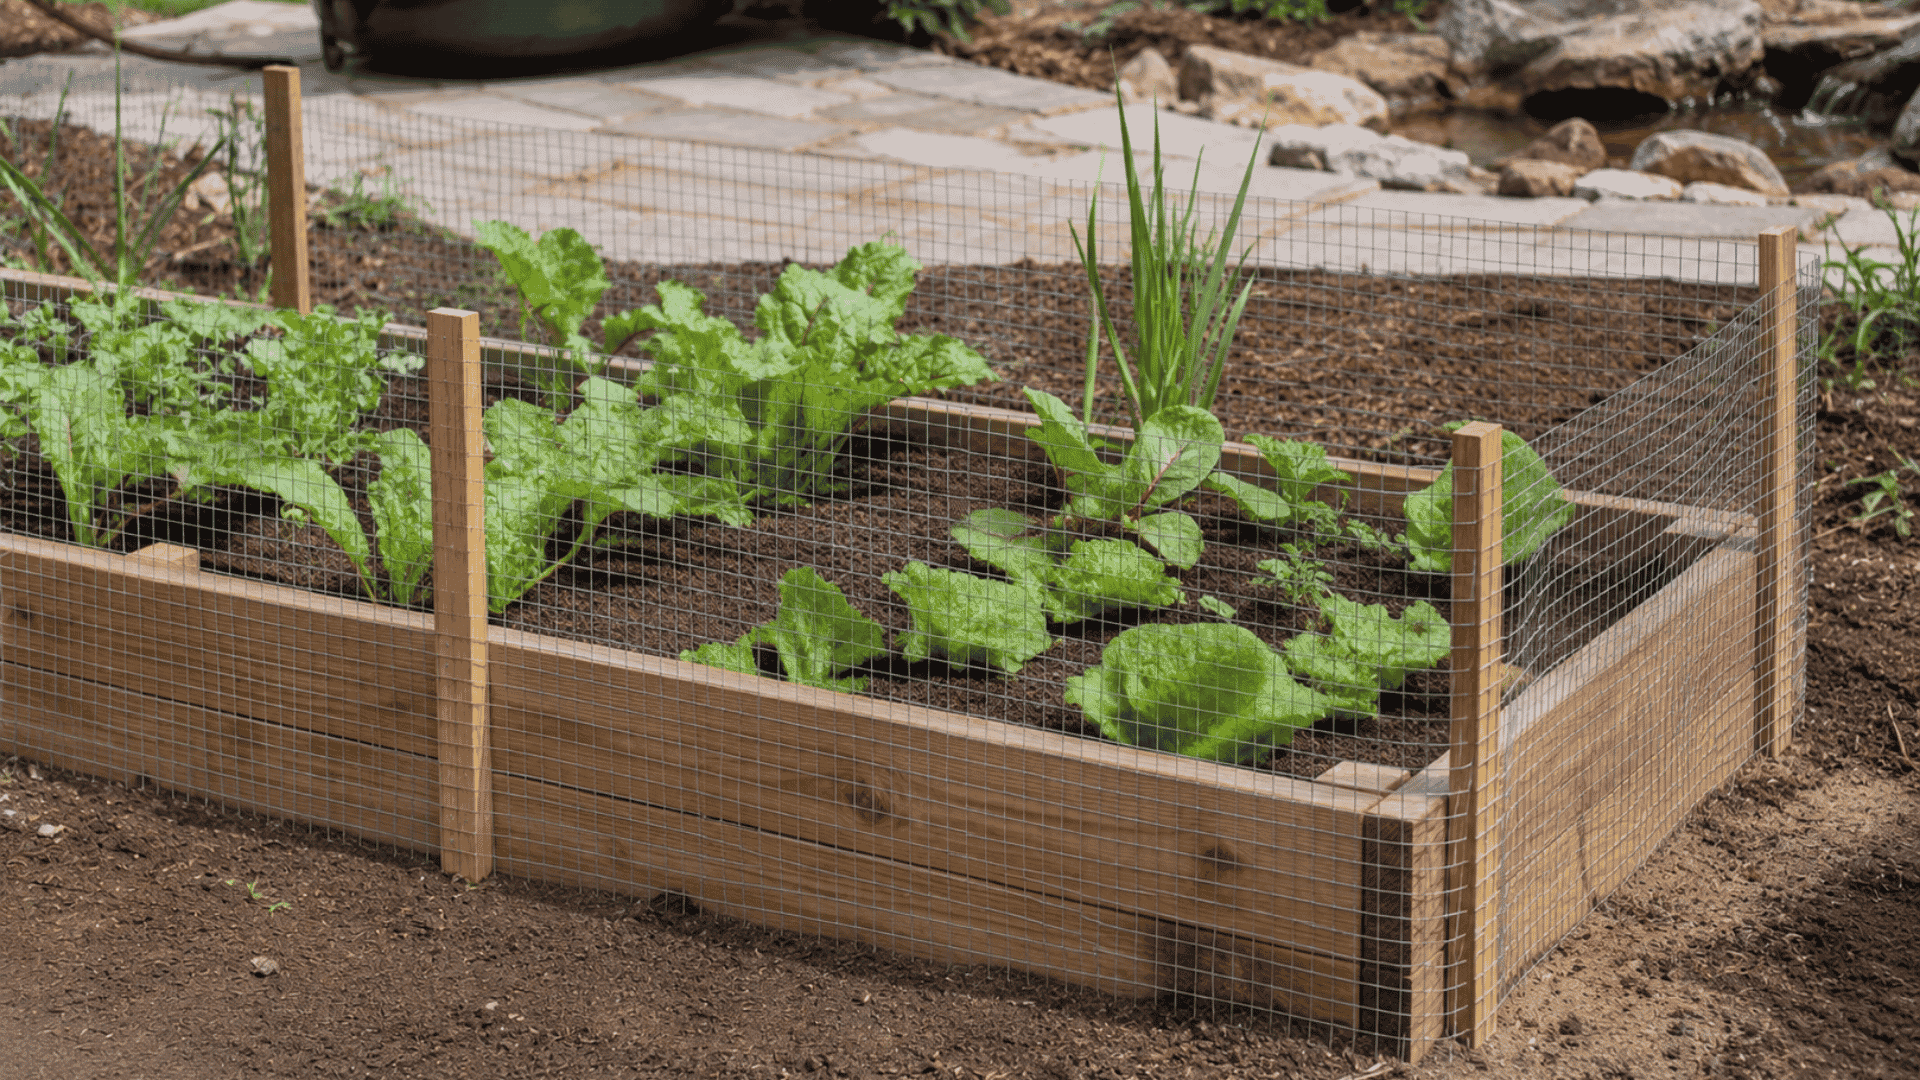
This fence is ideal for small raised beds with rabbits, rodents, or small pests. Hardware cloth has a smaller mesh than standard welded wire, so it blocks pests that can squeeze through larger gaps.
A 2 to 3-foot fence is often enough for raised beds. Burying the bottom edge a few inches helps stop pests from digging under it.
Is it Cheaper to Buy or Make a Fence for a Garden?
Making your own fence almost always costs less than buying a ready-made one. Most diy garden fence ideas on a budget come in well under $200 for a standard plot.
Store-bought panels can cost two to three times more once installation is added. Building it yourself gives you full control over size, materials, and spending.
| Fence Type | DIY Cost (Approx.) | Pre-Made or Installed Cost (Approx.) |
|---|---|---|
| T-Post and Wire Fence | $30 – $80 | $150 – $300 |
| Pallet Wood Fence | $10 – $40 | Not widely available |
| Wood and Wire Fence | $80 – $200 | $300 – $600 |
| Hardware Cloth Raised Bed | $20 – $60 | $100 – $250 |
| Bamboo Roll Fence | $25 – $70 | $80 – $200 |
Note: These costs may vary based on garden size, material quality, and your location.
Common Mistakes to Avoid While DIY Garden Fence
Even a simple garden fence can fail if small steps are skipped. Check these common mistakes before you start building.
- Digging post holes too shallow can make the fence lean over time.
- Adding rails before concrete cures can shift the posts.
- Skipping the diagonal gate brace can make the gate sag.
- Stapling wire before pulling it tight can leave permanent slack.
- Forgetting gravel under posts can lead to faster wood rot.
- Leaving gaps at the bottom can let rabbits and small pests in.
- Choosing the gate location too late can force you to reset posts.
Conclusion
A good garden fence starts with a clear plan, the right post type, and fencing material that matches your pest problem.
Wood posts work best for a long-term build, while T-posts are better for a seasonal setup.
Strong rails, tight wire, proper drainage, and a braced gate all help the fence last longer with fewer repairs.
Before you build, measure the space, check the soil, plan the gate, and choose materials that fit your budget.
A DIY garden fence does not need to be hard, but it does need careful setup. Start with a small layout, gather your supplies, and build a fence that protects your plants season after season.
Have you built a garden fence before? Share your tips or questions in the comments below.
Frequently Asked Questions
What Type of Fence is Best for a Windy Garden?
A wire fence is usually better than a solid panel fence in windy areas. It lets air pass through, which puts less pressure on the posts.
Should a Garden Fence Touch the Ground?
The bottom edge should sit close to the soil if pests are a concern. For small animals, the mesh should also be buried slightly or bent outward at the base.
How Far Should a Garden Fence be from The Plants?
Leave enough space to walk, water, weed, and harvest without pressing against the fence. A small path inside the fence makes maintenance much easier.