≡ Menu

Mongolian Beef and Broccoli


Mongolian Beef

I am, was, and always will be a fan of Mongolian Beef & Broccoli. That perfect marriage of tangy, sweet, salty, chewy… it’s just a wonderful thing. Sure, I know it isn’t “health food” by any stretch of the imagination, but it’s delicious and satisfying, and making it at home you can be sure of everything that goes into it.

Mongolian Beef Ingredients

It took me years to mimic the flavor of P.F. Chang’s Mongolian Beef sauce recipe, but once I got the sauce right, it was right. For this recipe though, I’m changing things up just a bit from the norm. Usually I would present a recipe and offer up options for vegetarians or vegans. This time, I’m giving you a complete recipe that is ready for vegans, and then giving the options for meat eaters.

gardein beefThe miracle that made this plant-based recipe possible was a product by the gardein company. In this case, it was their Sizzling Szechuan Beefless Strips. It comes with a premade sauce packet inside, but I wanted to stir things up and see just how well this particular product was going to work in a recipe that I worked long and hard to get just perfect. To be honest, I was skeptical.

I am very happy to report that the gardein product not only worked well in this dish, it was convincingly meaty, with a texture and appearance that would satisfy anyone.

5.0 from 1 reviews
Mongolian Beef and Broccoli
 
A copycat version of P.F. Chang's Mongolian Beef
Author:
Recipe type: Entree
Cuisine: Asian
Ingredients
  • ½ cup soy sauce
  • ½ cup water
  • ¾ cup dark brown sugar
  • 2 teaspoons vegetable oil
  • 1 tablespoon garlic, minced
  • 2 Tablespoon corn starch, dissolved in ¼ cup cool water
  • 2 large green onions, chopped
  • 1 package Gardein Sizzling Szechuan Beefless Strips (sauce packet removed)
  • 1 pound broccoli crowns
Instructions
  1. Cook the Beefless Strips according to package instructions.
  2. To make the sauce, heat vegetable oil and saute garlic in a small pan for 60 seconds over medium heat.
  3. Add soy sauce, water, and brown sugar and stir to combine fully. Bring to a boil and reduce heat to medium low. Allow to reduce for 2-3 minutes, then turn off the heat and stir in the corn starch to thicken.
  4. Steam broccoli crowns for 8-9 minutes until just tender.
  5. When Beefless Strips are cooked, toss them in sauce, and and pour the remainder over the broccoli, tossing to coat.
  6. Plate broccoli topped with Beefless Strips, a add a handful of chopped green onion just before serving.
Notes
For a beef version of this dish, you will need 1 lb flank steak (thinly sliced), about ¼ cup cornstarch in a zipper bag, and vegetable oil to fry it in.

Add the steak slices to the bag and shake to fully coat. Allow to remain in the corn starch until you are ready to fry them. Fry for a couple of minutes until brown, stirring to cook evenly. Drain on paper towels.


{ 3 comments }

Poverty In My Back Yard

Being poor sucks, and I’m not just talking about the “oh crap, I partied too hard last weekend and now I can’t pay my light bill” poor. I’m talking about the people who have next to nothing, live on next to nothing, and eat next to nothing.

Mapping Poverty in America

Using the interactive Mapping Poverty in America map provided by the New York Times, I learned that the neighborhood I call home has a poverty rate of 23.2%. That’s a fraction under 1/4 of the population. As if that wasn’t bad enough, I am less than a 2-minute walk from an area with a poverty rate of 47.7%, and areas that are lower than 23% are the exception in my area. In 2012, to qualify as being impoverished, a family of four could make no more than $23,283, while any individual under the age of 65 could make no more than $11,945.

NOTE: The map link above refers to 2012, but this 2013 report verifies that the number of people in poverty did not change between 2012 and 2013.

USDA Food Access Research Atlas

This map from the USDA Food Access Research Atlas using census data shows two things: tracts with over 100 households without vehicles (purple) and tracts with over 33% of households that are 1/2 mile or more from a grocery store (green). For clarification, everything that is marked purple is also green.

“Food deserts are defined as parts of the country vapid of fresh fruit, vegetables, and other healthful whole foods, usually found in
impoverished areas. This is largely due to a lack of grocery stores,
farmers’ markets, and healthy food providers.”
–USDA

mass transit timeThe nearest grocery store is 2 miles away from my address and it lacks decent fresh produce on a good day. The nearest food options that are 1 mile or less are fast food chains, neither of which would be classified as a grocery store, farmers’ market, or healthy food provider. If I didn’t have a car, I would be limited to the use of mass transit. As you can see from the image above, that trip via bus would take about 30 minutes, not including the time it took to walk to the bus and wait on the bus (both ways). Don’t forget that you’re riding the bus, so you can only buy what you can carry. And if the weather is bad or the bus is just late? Sucks to be you.

I share this information so that people will have a better understanding as to why I am a gardening and healthy food advocate. You don’t have to go to third world countries to see people starving to death. Right in our back yard children are suffering from obesity and malnutrition at the same time because they are surviving on a diet of prepackaged and drive-thru meals that are more filler than actual food.

In 2015 I will return often to these topics because as a society we need to know what is causing the issues of the day. Without many exceptions, it can be traced back to poverty and food insecurity. This year I promise to work harder than ever to research and offer solutions to these issues while teaching a new generation the many benefits of growing your own food. I promise to bring that information not just to the readers of this website, but also to my neighbors – the people in my back yard who are living in poverty.

There is something I can do, and I’m not going to stop until I feel as though I have done it.

{ 4 comments }

Homemade Calzones

I’ve been craving the crusty, saucy, gooey cheesy goodness of calzones for months.

Homemade Calzones

I start by making my homemade pizza dough in the bread machine because I don’t have a stand mixer and it really is easy to add all of the ingredients, press start and come back a couple of hours later to dough that’s ready to go. Whatever method you choose for making the dough, you will want to punch it down after it has risen and divide it into four equal pieces. Work those pieces into a seamless ball and press into discs like these beauties:

Calzone Dough

At this point you can use a rolling pin or your hands to flatten the discs to a thickness of about 1/4”.

Calzone Dough Rolling

This will yield a circle of dough roughly the size of a small pizza. When you reach this point, you are ready to put together some seriously delicious calzones.

Calzone Dough Rolled

Grab your choice of sauce and fillings and make a small pile on the right side of the circle, leaving about an inch of empty space around the outer edge. You’ll need this to press the outside of the calzone together to make a pocket. It may help to lightly damped the outer edge to help it seal well.

Calzone Filling

Place the calzones on a baking sheet lined with parchment paper. At this point I brush the tops with olive oil spiked with a little garlic powder.

Calzones Ready for the Oven

Shove ‘em in the oven for 15 – 18 minutes, or until they turn a light golden color and you just can’t stand it anymore. Remove them from the oven and let the cool for at least 10 minutes, unless you like to get a mouthful of molten lava.

Homemade Calzones 2

Homemade Calzones
 
Warm pockets of crusty, cheesy, saucy goodness? Yes, please.
Author:
Cuisine: Italian
Ingredients
  • pizza dough
  • marinara
  • cheese
  • pizza fillings
Instructions
  1. Preheat oven to 475F.
  2. Divide a standard pizza dough recipe into four equal parts and form into balls. On a floured surface, flatten dough balls into1/4" discs about a foot across.
  3. Add a few tablespoons of sauce on the right half of the dough leaving an inch of dry space around the outer edge. Add your choice of fillings, careful not to stuff them too full or they'll burst while baking.
  4. Dampen the outer edge of the circle, fold the left half over the right and press the edges together firmly to create a pocket. Transfer to a baking sheet lined with parchment paper.
  5. Brush with olive oil and bake for 15-18 minutes, until the tops become lightly golden.
  6. Remove from the oven and allow to cool for 10 minutes before serving.
  7. Serve with a small bowl of warm marinara sauce for dipping.


{ 0 comments }

Michael Nolan Brings Great Plates to RV Life Magazine

My love for great food knows no limits, and it’s time for me to come clean about a secret I have kept from you for a while now. I am the new food columnist for lifestyle magazine RV Life beginning with this month’s issue!

Great Plates is exclusive to RV Life Magazine

My column is called Great Plates, and in staying true to the ideals I have held dear for many years, it will focus on wholesome dishes made with fresh, ingredients instead of convenience foods. Because of the nature of the magazine audience, I work hard to keep the kitchen time to a minimum, usually about half an hour but always less than an hour.

This month is all about soup. Nothing breaks through the cold winter like a hot bowl of hearty soup, and I give you three of my made-from-scratch favorites from which to choose.

I take the reigns from my friend Kris Weatherbee whose Dish D’lish column has been a favorite among readers for two years. Kris set a high standard that I will have to work hard to maintain. I’m very happy to be a part of RV Life, and I look forward to sharing Great Plates for a long time to come.

{ 1 comment }

Adventures in Suburban Permaculture

When I relocated to a small town just south of Atlanta last summer, I was faced with a typical suburban lot that had been unchanged save for routine yard maintenance for several years. While that meant I had free reign over the outdoor space, it also mean that there would be a lot of work required just to create a blank canvas on which to work. Lucky for me I have never been one to shy away from a challenge. I knew immediately what I wanted to do – create a permaculture-based garden that would be an easy to maintain ecosystem packed with edibles that would feed us, but also act as a source of food and shelter for the creatures that play an important role in this circle of life.

Celeste Fig

The front yard is average sized and nondescript. Grass runs from the overgrown sidewalk to the front of the house with a few basic shrubs. I planted a small Celeste fig tree in the center of the yard, but haven’t done much more to the front for the time being. When you take a look at what’s happening behind the house, you will understand why.

The image below shows a satellite image of the property with the back yard marked with red:

Back Lot

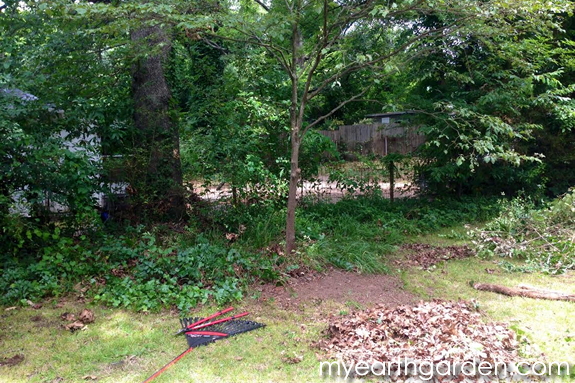
This was the front corner of the back yard the first time I saw it:

Back Garden Before

Managed, but definitely not reaching its full potential. The back yard is sizeable for a suburban lot, full of grass with the perimeter thickly ringed by privet and English ivy (all of which has to go).

The first thing I did was to put that green bin to use; a friend had drilled holes in it a few years ago for use as a compost bin but it was never used. That is no longer the case as all kitchen waste is being composted. Less than six months later, that bin is nearly full using only the compostable kitchen waste created by two adults. That adds up to a good amount of usable compost next spring.

But back to the front corner… in the center of that clump of overgrown mess in the top center of the photo above was a struggling dogwood. It was the first thing I noticed on my first walk around the yard and I knew I would want to free it first to give it a chance at thriving next year.

Back Garden During 1

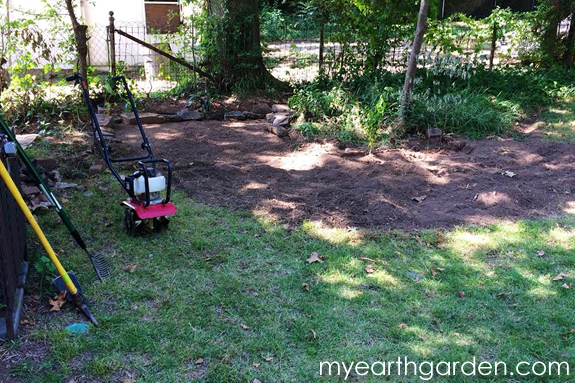
You can see the transformation (above) after just cutting away the brush that was choking the young tree. I would continue to clear away the weeds, thorns, and English ivy over the days and weeks that followed, until I was able to till the area that was one under that pile of brush:

Back Garden During 2

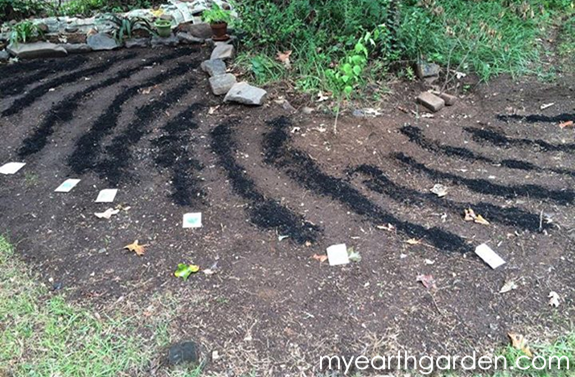
Freshly tilled and amended, I couldn’t wait to plant a few fall edibles. This year I was happy to plant seeds from the Renee’s Garden collection after the company sent me a ton of great options as a birthday gift in August.

Back Garden Planting

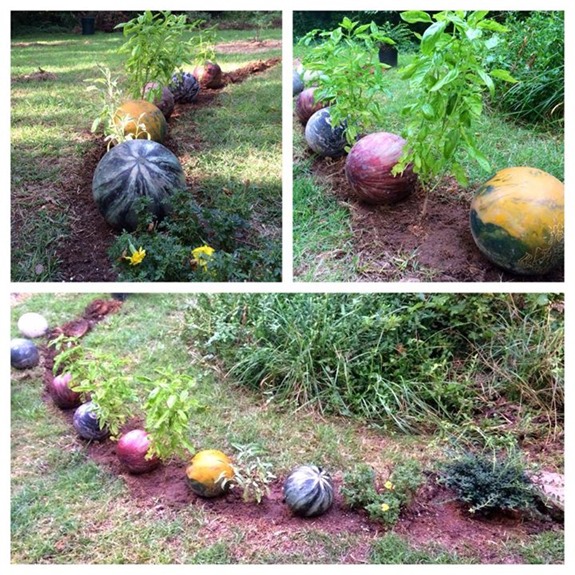
At the same time, I got the itch to have something to look at while the rest of the space was in such upheaval. I found just the right ornaments in the form of several old bowling balls that I quickly included in a curved planting with my potted herbs:

Bowling Ball Garden

Back Garden Labyrinth

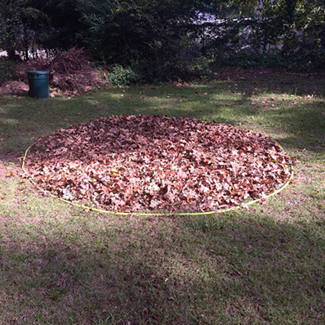
The pile of leaves in the center of the yard isn’t the result of laziness on my part. This area is going to be the centerpiece of the new garden space when I turn it into a labyrinth next year. In the upper left of the photo you can also catch a glimpse of the new composting area, aptly dubbed “Compost Corner”.  More on that in a future post as well.

I have a lot more to share, but it will have to wait for another day. There’s so much left to show you (and so much left to do!)

NOTE: This post is a long one, due to the fact that this website had to be rebuilt after a fatal database crash in July. For that reason, there is a lot of info that spans several months.

{ 0 comments }

How to Start Rosemary from a Cutting

Rosemary is one of my favorite herbs.

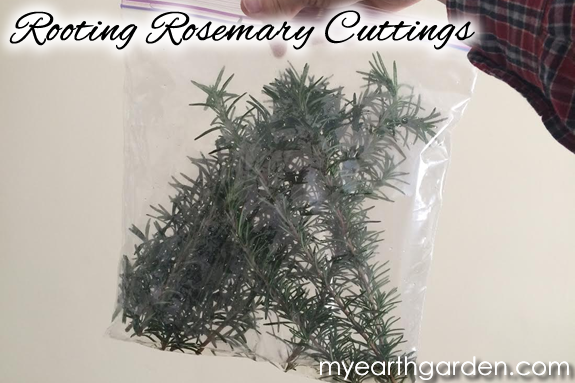
Its culinary uses are endless, its scent is relaxing, and it’s a pretty plant to boot. It’s also incredibly easy to grow and can take a beating and come back for more year after year. With an enormous new permaculture garden underway, I knew I wanted rosemary to play a big role. Rather than start a bunch of rosemary plants from seed or buy them, I opted to start my own rosemary plants from cuttings.

Rooting Rosemary Cuttings

[click to continue…]

{ 3 comments }

Smooth as Silk Roasted Corn Chowder

Roasted Corn Chowder

You might not be thinking about soups and stews in the heat of the summer, but when fresh corn is at its peak, I just can’t help myself. My Roasted Corn Chowder is rich and creamy, and no one would believe that it is completely vegan! You won’t miss the butter or heavy cream – in fact, you will think you taste them and yet there is none in this recipe.

Give it a shot and don’t tell your guests that it is vegan. No one will ever know.

[click to continue…]

{ 0 comments }

Roasted Cherry Tomatoes

Now that the summer tomato harvest is beginning for most of us, it seemed only right that we delve headlong into an easy, tasty tomato recipe. One of my favorite ways to prepare the little bulbs of sweetness known as cherry tomatoes is to roast them, so that’s what we’re going to explore today.

There is no doubt that when it comes to produce, tomatoes are at the top of my list of favorites. You can prepare them any way imaginable: slice them for a sandwich, coat and fry them when they’re green, chop them for salsa, slow cook and puree them for sauce… the delectable list goes on and on.

The best part about this particular recipe for Roasted Cherry Tomatoes is that if you can turn on the oven, you can make this amazing magic happen in less than half an hour.Roasted Cherry Tomatoes

[click to continue…]

{ 1 comment }

6 Things You Need to Know

6 Things You Need to Know


[click to continue…]

{ 0 comments }

Homemade Baked Ziti

If you don’t love pasta, I don’t know what is wrong with you. What I do know is that my homemade baked ziti will probably cure you of whatever it is.

Homemade Baked Ziti


[click to continue…]

{ 0 comments }